Day of the Dead bread. Bake your own orange-flavored, authentic, Mexican Pan de Muerto, ideal for adorning your traditional Day of the Dead display, using this step-by-step recipe and video.

Day of the Dead bread doesn’t just look spectacular, it tastes great, too. Enjoy it alone, dipped in Mexican hot chocolate, or accompanied with a cup of warm atole.
Day of the Dead Bread Variations
Day of the Dead bread comes in many different variations depending on the region.
This recipe is a traditional Day of the Dead bread, known throughout the world, round, with “bones or tears,” and sprinkled with sugar.
There are, however, many other variations including:
- Covered with butter and sugar, often white, sometimes other colors, but pink is very popular, too.
- With an egg wash and sesame seeds.
- Covered in a white glaze and colorful designs.
- Decorated with fine white glaze details over an egg-washed background.
Even further, in places like Guanajuato and Michoacán, they bake a very special bread called Pan de muerto de ánimas (Day of the Dead souls’ bread, roughly translated). This version is a lime-flavored bread covered in a sweet and tart glaze and hot pink-colored sugar. Very delicious!


Learn about the Ofrenda elements and their meaning. Get inspiration to create your Ofrenda at home this Day of the Dead.
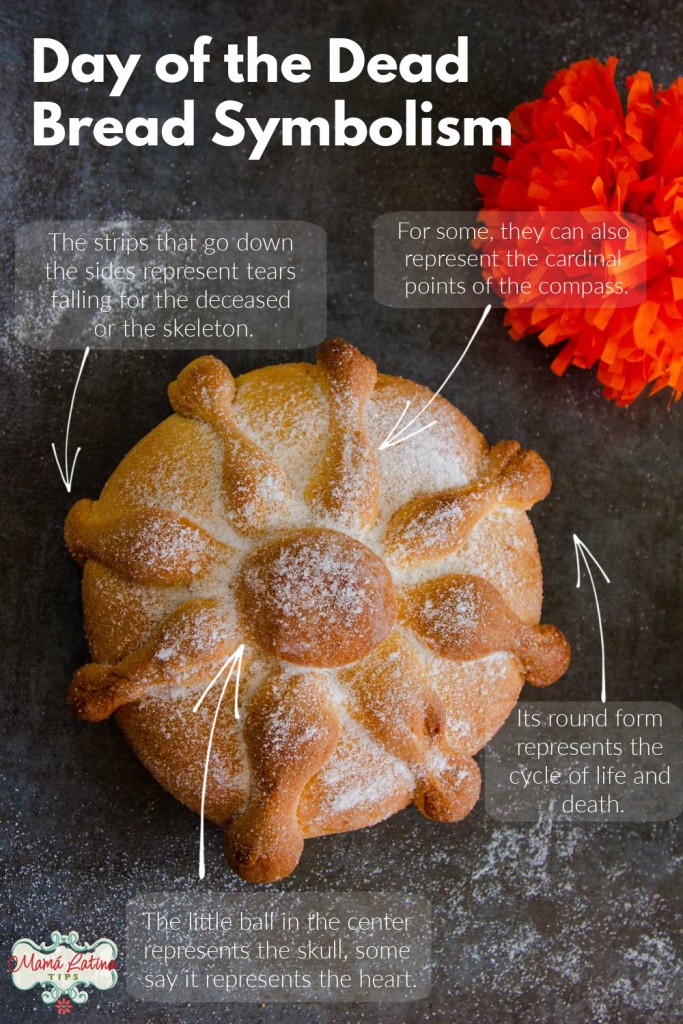
The Symbolism of Day of the Dead Bread
As with many other Mexican breads, each part that makes up the bread has its own meaning.
Ok, let’s get started. You don’t need any special equipment, you can do it all by hand. But if you have a large mixer with a bread hook, feel free to use it.
This recipe does not use orange blossom tea, just orange juice, but you can use whichever you prefer.
Traditional Mexican Day of the Dead Bread
Prep Time: 5 minutes – Rest time: 2.5-3 hours. – Total time beginning to end: about 5 hours.
Yields two loaves about 6.5 inches in diameter. Each loaf yields about 6-8 slices.
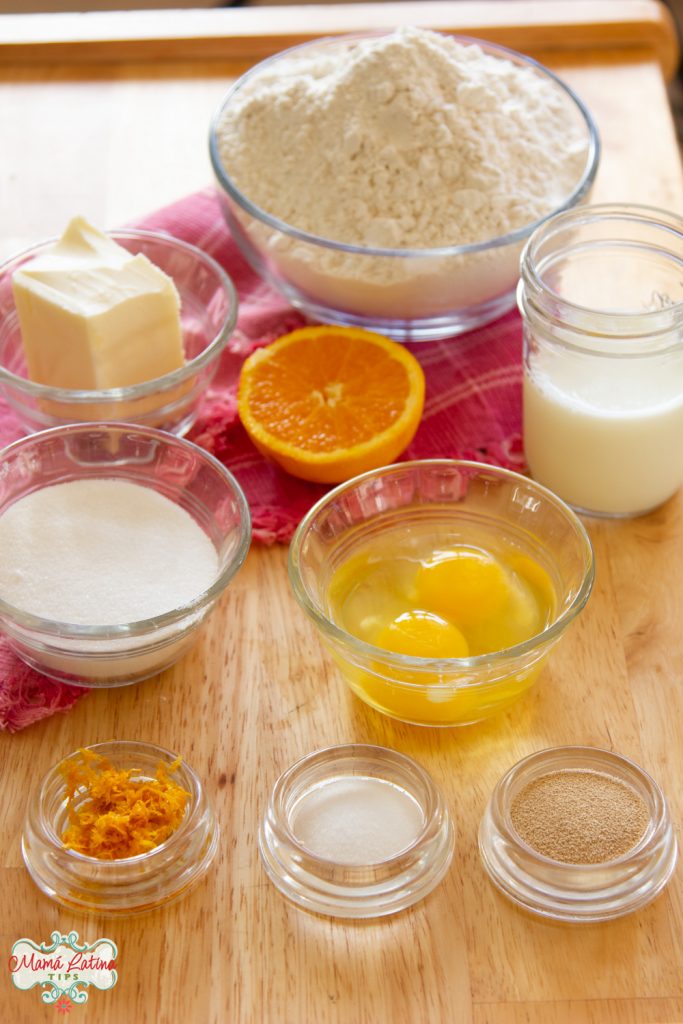
Ingredients
- 1 tablespoon active dry yeast (10 gm)
- 4 cups (500 gm) all-purpose white flour, divided between the starter and bread
- 1/2 cup milk (120 ml)
- 3/4 cup sugar (150 gm), divided between the starter, the bread, and egg wash.
- 1 teaspoon salt (6 gm)
- 2 medium eggs + 1 if you want to make an egg wash.
- 3/4 cup unsalted butter (120 gm) divided between the bread and the egg wash.
- Zest of one orange.
- 1 1/2 tablespoons of orange juice
Utensils
- Measuring spoons
- Measuring cups or kitchen scale
- Liquid thermometer
- Small size bowl
- Medium size bowl
- Kitchen mixer with bread hook (optional)
- Plastic wrap or a large kitchen towel
- Pastry brush
- Large baking sheet
- Aluminum Foil
- Parchment paper or silicone baking mat
- Cooling rack
- Small bowl for egg wash, if necessary.
Directions
We recommend that you read the whole recipe first to get an idea of the timing, process, and how the ingredients come together. Although the process is a little bit more involved, it is well worth it.
Prepare the Yeast Starter
The milk should be warm to the touch, but not hot, the ideal temperature is between 100-110F (37-43 C). If you don’t have a kitchen thermometer for liquids, I recommend that you consider getting one. They aren’t too expensive and they really help a lot with this bread and lots of other things.
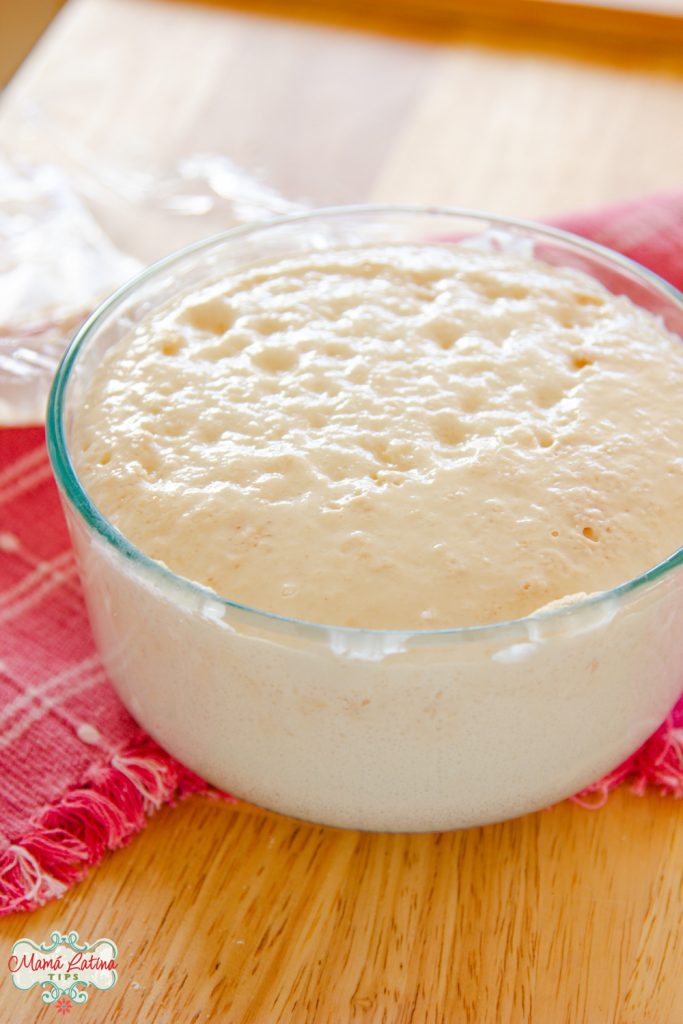
In a medium bowl, combine the active dry yeast, 1/3 cup of flour (~60 gm), and the milk. Stir with a spoon to remove the clumps as much as possible. This will take you approximately 5-6 minutes.
Add a teaspoon of sugar, stir again, cover with plastic wrap or kitchen towel and let rest in a warm place for 20-30 minutes or until it is foaming and doubled in size.
In the meantime, weigh out and prepare the rest of the ingredients. Remove the eggs and butter from the refrigerator so that the reach room temperature before using, and measure the salt.
Preparing the Dough
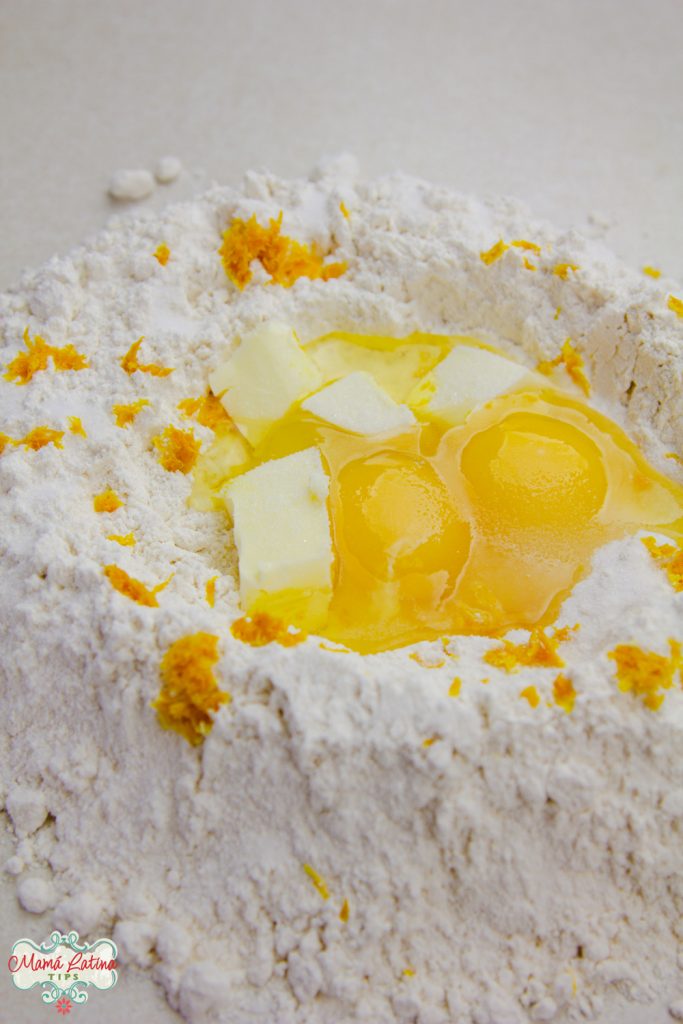
Once the starter has activated and doubled in size, pour the rest of the flour out on a clean, dry surface and make a well in the center.
Divide the butter. For the dough you need about 1/2 cup, cover the rest and set apart for later.
Sprinkle the salt in the flour around the outside part of the well, we don’t want the salt to touch the starter directly.
Mixing tip: If you have a large mixer with a bread dough hook, you can use it. The kneading time will be greatly reduced. However, you must continually watch it to get to the right consistency, which we describe and show in the manual kneading instructions.
Add the eggs, half of the butter in pieces, another tablespoon of sugar, and the orange zest to the center of the well and, with your fingers, begin mixing, bringing in the flour from the inner edge of the well bit by bit.
We recommend that you try to keep the sides of the well raised high, so that the yeast mixture does not cause a dam break and flood over the work surface when it is added to the dough.
Pour the active yeast starter into the well and continue mixing, the dough will feel wet in the center of the well, but as you continue to integrate the flour it will begin to firm up.
Add the other half of the butter and keep kneading.
Add 1/2 tablespoon orange juice and continue kneading. If you feel the dough needs a little more liquid because it is dry (you will know this because you will see how it peels off in layers and you will see flour between them), add another 1 / 2 tablespoon of juice.
Separate 1/4 cup of sugar and set apart for after the bread is baked.
Roll out the dough and sprinkle the rest of the sugar on top, then continue kneading.
You will notice that, while you are integrating the sugar, the dough will get sticky again. This is completely normal and that is the reason why we added the liquid before the sugar. If it is done the opposite way, less liquid would be used and in the end the dough would be dry.
Continue kneading and, little by little, you will see that the dough becomes less sticky on your work surface and your hands. It will feel wet but will start to take on more body.
In the beginning, if you were to stretch it, it would break, but as you knead it, you will see how the gluten develops and how the dough becomes smoother and more elastic.
If you are kneading by hand, the process will take about 20-22 minutes (if you are using a mixer, it might take only 10 minutes). Be sure to keep a glass of water or your favorite beverage nearby to drink, put on some music you like, and enjoy the kneading.
Kneading by hand takes love and patience. It’s very comforting, however, to feel the dough changing and responding to touch, and I enjoy smelling the exquisite butter and orange fragrances wafting from the dough.
After 20 minutes or so, you’ll notice that the dough is stretching and not breaking, is elastic, and has a little pull to it.
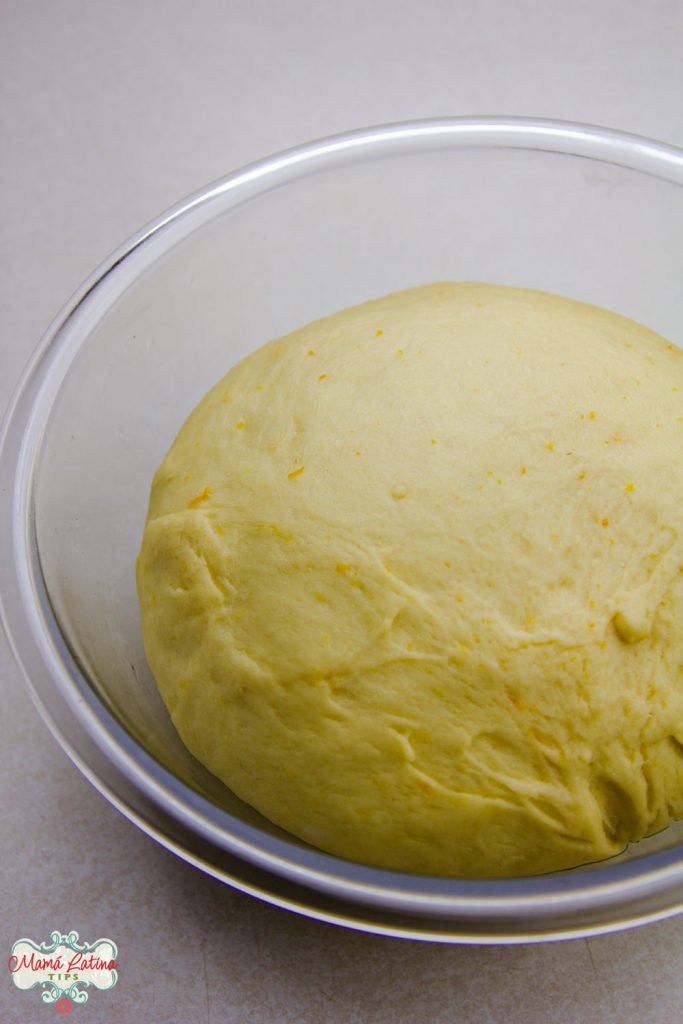
The First Rest – Rise
Grease a medium-size bowl with a little bit of vegetable oil, place the dough ball in the bottom and then give it a flip so both sides of the dough are oiled. This will keep it from drying out and sticking to the bowl while rising.
Cover the bowl with a clean kitchen towel, or plastic kitchen wrap, and place in a warm spot away from any draughts until it has doubled in size, about an hour.
Notes about the rise: Dough rising time can vary a lot depending on the temperature and humidity where you are or even if you have air conditioning in your house.
Therefore, the 60-minute rising time can be less if it’s warmer or more if it’s cooler. Check on it around 45 minutes to see if it has doubled in size or not, when it has, it’s ready.
Tip for knowing when the dough has doubled in size: Take a photo before you put it to rest. Having a visual reference really helps.
Forming the Day of the Dead Bread
Lightly flour a clean surface, punch the dough down to release the air from it, and place the dough in the center of your work surface. Divide it into two. If you have a kitchen scale, you can weigh them if you want them exactly the same size.
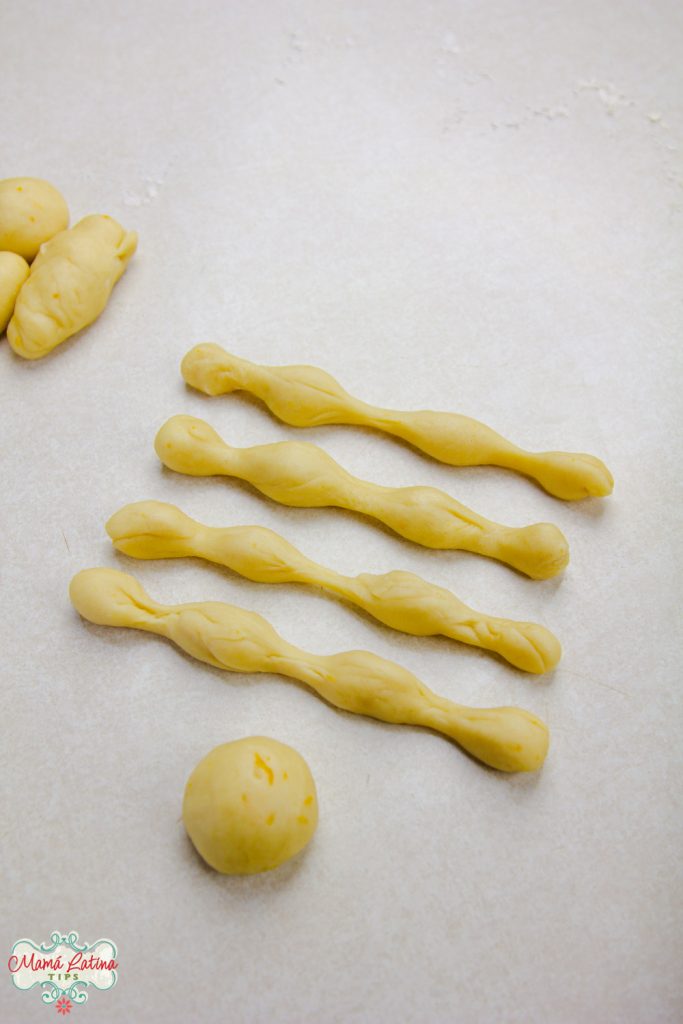
Cut off a fifth of each of the two balls, and divide each of these fifths into 5 pieces each.
Take one of the two dough halves, and knead it for a few seconds, then form it into a ball. Repeat with the other half.
Cover a baking sheet with parchment paper, a silicone baking mat, or if you don’t have either of these, grease with butter.
Place the two dough balls on top of the baking sheet, leaving plenty of space between them and the edges. With the palm of your hand gently push down on each to flatten them a little.
Take each of the 10 small pieces you have left and roll them lightly on the floured surface. This will make the dough a tiny bit drier and will help keep its form when it is time to bake.
Making the “Bones”
Tip for making the “bones” more easily: Clean and dry your work area really well, you don’t want any flour or grease on it. When you’ve got that, the dough will stick a little bit to the surface offering a little resistance to the dough as you roll and form it into your little bones, making it easier to get the shapes you want.
Take one of the ten little dough balls and roll it over the work surface to make a long tube or sausage shape. Next, with your finger, roll it in the middle of the tube with a little bit of pressure until it forms two fatter areas on the ends with a narrower center (See photo below).
Now, roll your finger over the middle of one of the two fatter areas and then the other in such a way that you end up with three narrower areas and four fatter areas.
Take the next small ball and repeat until you have eight in total, each with three narrower areas and four fatter areas. With the remaining two balls, roll them on the surface until you have two smooth round dough balls.
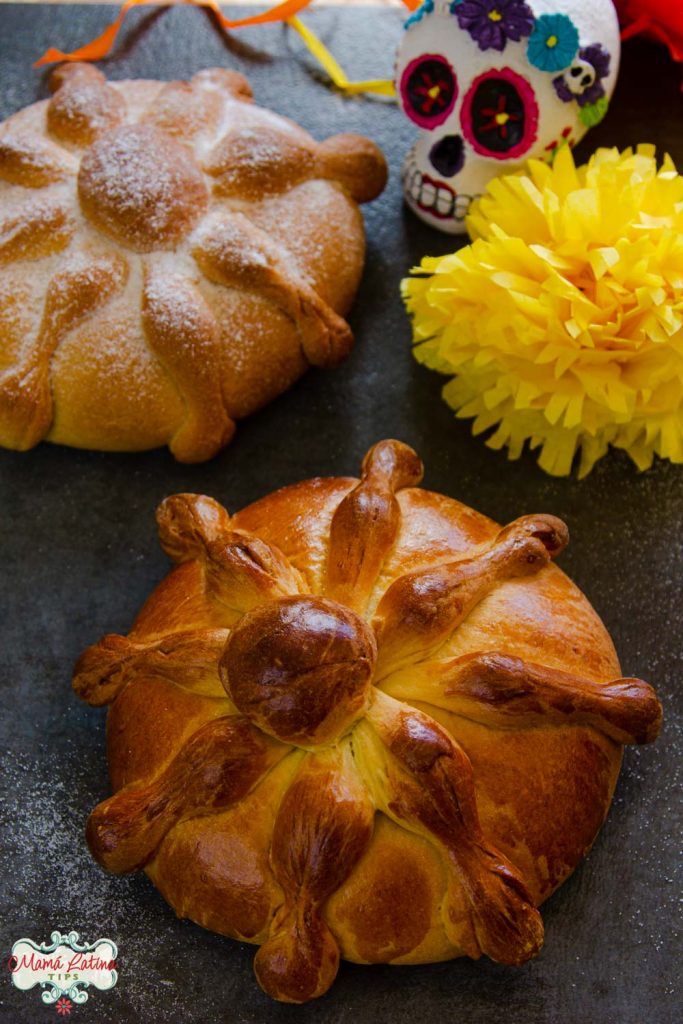
Brush one of the two flattened bread rounds with a bit of cold water using a kitchen brush, this will act like a bit of glue.
Take one of the little “bones” and stretch it a little at the center. Place it across the center of the bread. Carefully, stretch the two ends of the little bone until it covers the entire diameter of the bread until each end almost touches the baking pan.
Repeat until you have placed four strips of bone on the bread, as seen in the photo. With your finger, gently squeeze the center at the union of all the strips, brush with a little water, and place one of the balls on the bread, right in the middle.
Do the same with the other loaf.

Second Rise
Cover and let stand in a warm place away from drafts for another hour or until they have more or less doubled in size.
Pre-heat oven to 325 °F (165 °C).
Once the loaves have doubled in size, prepare them for baking.
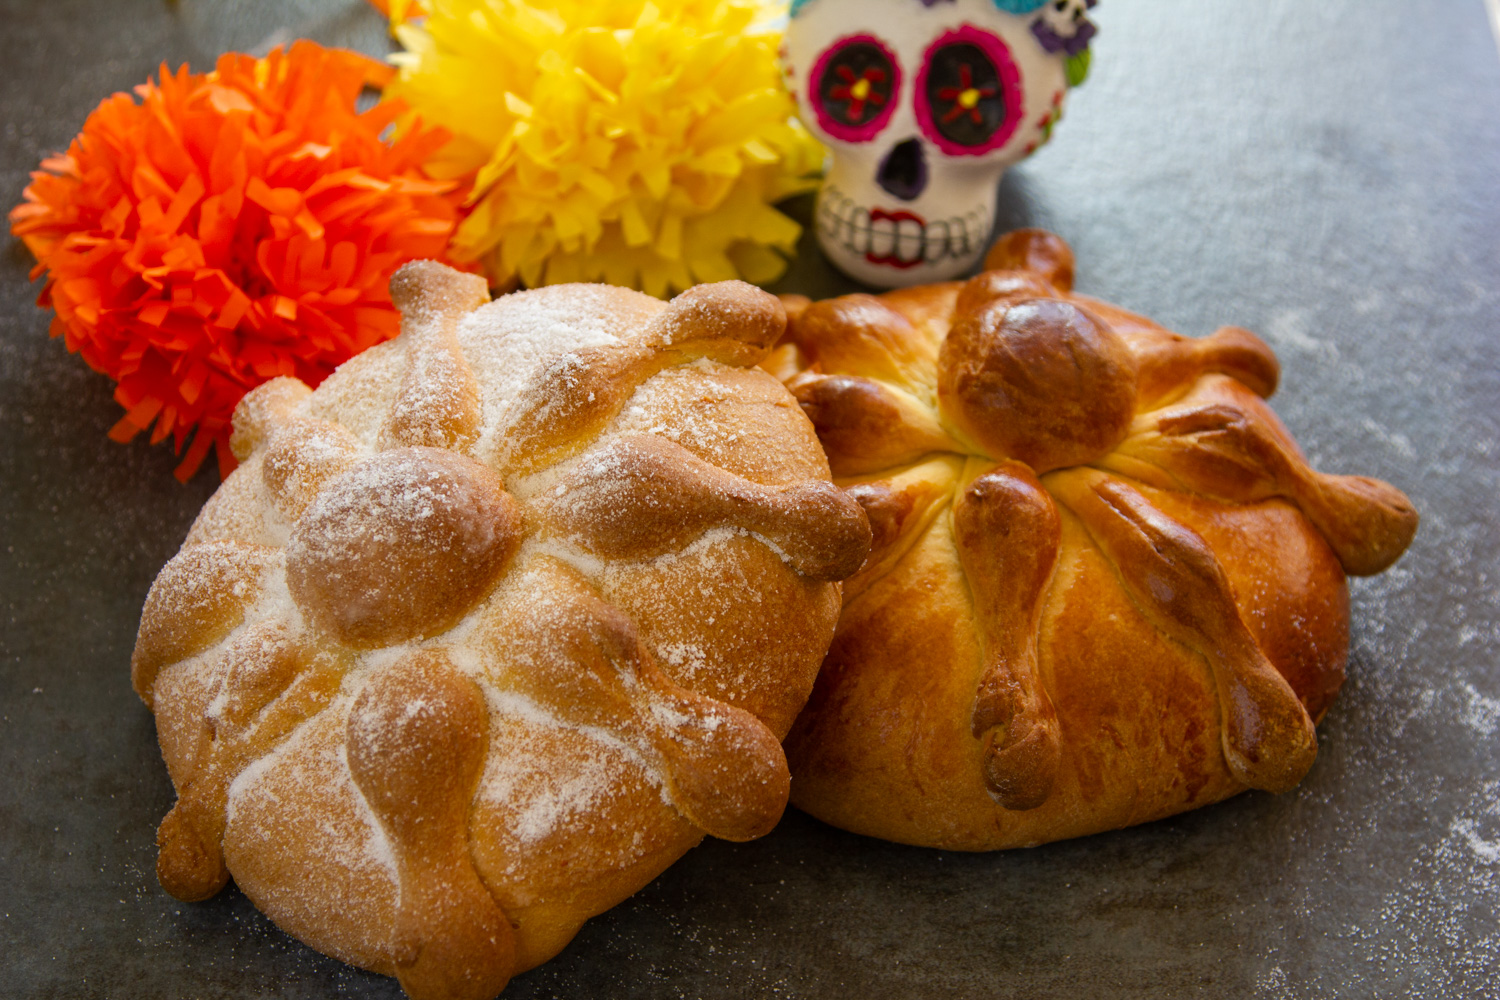
There are two options for finishing the loaves, one is done before baking and the other after. Since I make two loaves, I usually prepare one of each.
Before baking option: coat the bread with an egg wash. Beat an egg yolk with a fork, adding a little water to dilute the egg. Using a pastry brush, carefully brush a thin layer of egg over the entire bread loaf. It is very delicate, you don’t want to press the air out of the dough.
After baking option: Once the bread has cooled a bit, melt the butter that you separated. With a clean pastry brush, brush a layer of butter on the bread and immediately cover it with the rest of the sugar.
Baking the Pan de Muerto
Place your baking sheet with the loaves on a rack in the center of the oven and bake for 30-40 minutes.
Important Note: Check at half way, and turn the tray if necessary for even baking.
If, after 15-20 minutes, you check them and they already look golden brown over their entire surfaces, cover the loaves with aluminum foil to protect them while they finish baking.
The loaves are ready when you tap them with your fingers lightly on the bottom and they sound hollow. Be careful when checking them, use an oven mitt because they will be very hot and the bread is a bit heavy.
That’s it. Enjoy with a cup of hot chocolate, atole, or champurrado, or display them on Day of the Dead, as they will look beautiful in your “ofrenda”
That’s it. Enjoy this traditional Mexican sweet bread with a cup of hot chocolate, atole, or champurrado, or display it on Día de los Muertos, next to sugar skulls on your “ofrenda” on November 1st and November 2nd.
Frequently Asked Questions
Do I need orange blossom water to make Pan de Muerto?
No, you don’t. Even though orange blossom water is traditionally used, you can use orange juice, as I used in this recipe. You can also use other flavors like anise seed or chocolate.
Can I use different colored sugar for decoration?
Yes, the traditional pan the muerto, is decorated with granulated white sugar, but you can also use red sugar or other colors like pink or blue.
How to store it?
Place your leftover bread in an airtight container and keep it on your counter, I like to put it inside my microwave if you are going to eat it within 24 hours. For longer storage, put it in the fridge.
Is this delicious bread just for the Day of the Dead celebrations?
No, even though is tradition to make this pan dulce for Día de Muertos, some families prepare it during the last days of October and the rest of the month of November to enjoy it with their families.
Try More Mexican Bread Recipes
Do you like Mexican bread and pan dulce? Try at least one of these authentic pan dulce ideas.
Mexican Day of the Dead Bread
Ingredients
- 1 tablespoon active dry yeast 10 gm
- 4 cups all-purpose white flour, divided between the starter and bread (500 gm)
- 1/2 cup milk (120 ml)
- 3/4 cup sugar (150 gm), divided between the starter, the bread, and egg wash.
- 1 teaspoon salt (6 gm)
- 2 medium eggs + 1 if you want to make an egg wash.
- 3/4 cup unsalted butter (120 gm) divided between the bread and the egg wash.
- Zest of one orange.
- 1 1/2 tablespoons of orange juice
Utensilios
- * Measuring spoons
- Measuring cups or kitchen scale
- Liquid thermometer
- Medium-size bowl
- Kitchen mixer with bread hook (optional)
- Plastic wrap or a large kitchen towel
- Pastry brush
- Large baking sheet
- Aluminum foil
- Cooling rack
Instructions
- We recommend that you read the whole recipe first to get an idea of the timing, process, and how the ingredients come together. Although the process is a little bit more involved, it is well worth it.
Prepare the Yeast Starter
- The milk should be warm to the touch, but not hot, the ideal temperature is between 100-110F (37-43 C). If you don’t have a kitchen thermometer for liquids, I recommend that you consider getting one. They aren’t too expensive and they really help a lot with this bread and lots of other things.
- In a medium bowl, combine the active dry yeast, 1/3 cup of flour (~60 gm), and the milk. Stir with a spoon to remove the clumps as much as possible. This will take you approximately 5-6 minutes.
- Add a teaspoon of sugar, stir again, cover with plastic wrap or kitchen towel and let rest in a warm place for 20-30 minutes or until it is foaming and doubled in size.
- In the meantime, weigh out and prepare the rest of the ingredients. Remove the eggs and butter from the refrigerator, and measure the salt.
Preparing the Dough
- Once the starter has activated and doubled in size, pour the rest of the flour out on a clean, dry surface and make a well in the center.
- Divide the butter. For the dough you need about 1/2 cup, cover the rest and set apart for later.
- Sprinkle the salt in the flour around the outside part of the well, we don’t want the salt to touch the starter directly.
- Mixing tip: If you have a large mixer with a bread dough hook you can use it, the kneading time will be greatly reduced. However, you have to continually watch it to get to the right consistency, which we describe and show in the manual kneading instructions.
- Add the eggs, half of the butter in pieces, another tablespoon of sugar, and the orange zest to the center of the well and, with your fingers, begin mixing, bringing in the flour from the inner edge of the well bit by bit.
- We recommend that you try to keep the sides of the well raised high, so that the yeast mixture does not create a dam break and flood over the work surface when it is added to the dough.
- Pour the active yeast starter into the well and continue mixing, the dough will feel wet in the center of the well, but as you continue to integrate the flour it will begin to firm up.
- Add the other half of the butter and keep kneading.
- Add 1/2 tablespoon of the orange juice and continue kneading, if you feel that the dough needs a little more liquid because it is dry (you will know this because you will see how it peels off in layers and you will see flour between them) add another 1 / 2 tablespoon of juice.
- Separate 1/4 cup of sugar and set apart for after the bread is baked.
- Roll out the dough and sprinkle the rest of the sugar on top, then continue kneading.
- You will notice that while you are integrating the sugar the dough will get sticky again, this is completely normal, that is the reason why we added the liquid before the sugar, if it is done the opposite way, less liquid would be used and in the end the dough would be dry.
- Continue kneading and little by little you will see that the dough will become less sticky on your work surface and your hands. It will feel wet, but will start to take on more body.
- In the beginning, if you were to stretch it, it would break, but as you knead it, you will see how the gluten develops and how the dough becomes smoother and more elastic.
- If you are kneading by hand, the process will take about 20-22 minutes (if you are using a mixer, it might take only 10 minutes). Be sure to keep a glass of water nearby to drink, or your favorite beverage, put on some music you like, and enjoy the kneading.
- Kneading by hand takes love and patience. It’s very comforting, however, to feel the dough changing and responding to touch, and I enjoy smelling the exquisite butter and orange fragrances wafting from the dough.
- After 20 minutes or so you’ll notice that the dough is stretching and not breaking, and is elastic and has a little pull to it.
The First Rest – Rise
- Grease a medium size bowl with a little bit of vegetable oil, place the dough ball in the bottom and then give it a flip so both sides of the dough are oiled. This will keep it from drying out and sticking to the bowl while rising.
- Cover the bowl with a moist kitchen towel or plastic kitchen wrap and place in a warm spot away from any draughts until it has doubled in size, about an hour.
- Notes about the rise: Dough rising time can vary a lot depending on the temperature and humidity where you are or even if you have air conditioning in your house.
- Therefore, the 60-minute rising time can be less if it’s warmer or more if it’s cooler. Check on it around 45 minutes to see if it has doubled in size or not, when it has, it’s ready.
- Tip for knowing when the dough has doubled in size: Take a photo before you put it to rest. Having a visual reference really helps.
Forming the Day of the Dead Bread
- Lightly flour a clean surface. Punch the dough down to release the air from it and place the dough in the center of your work surface. Divide it into two. If you have a kitchen scale, you can weigh them if you want them exactly the same size.
- Cut a fifth off of each of the two balls, and divide each of these fifths into 5 pieces each.
- Take one of the two dough halves, and knead it for a few seconds, then form it into a ball. Repeat with the other half.
- Cover a baking sheet with parchment paper, a silicone baking mat, or if you don’t have either of these, grease with butter.
- Place the two dough balls on top of the baking sheet, leaving plenty of space between them and the edges, and with the palm of your hand gently push down on each to flatten them a little.
- Take each of the 10 small pieces you have left and roll them lightly on the floured surface. This will make the dough a tiny bit drier and will help keep their form when it is time to bake.
Making the “Bones”
- Tip for making the “bones” more easily: Clean and dry your work area really well, you don’t want any flour or grease on it. When you’ve got that, the dough will stick a little bit to the surface offering a little resistance to the dough as you roll and form it into your little bones, making it easier to get the shapes you want.
- Take one of the ten little dough balls and roll it over the work surface to make a long tube. Next, with your finger, roll it in the middle of the tube with a little bit of pressure until it forms two fatter areas on the ends with a narrower center (See photo below).
- Now, roll your finger over the middle of one of the two fatter areas and then the other in such a way so that you end up with three narrower areas and four fatter areas.
- Repeat with seven more balls, until you have eight in total, each with three narrower areas and four fatter areas. With the remaining two balls, roll them on the surface until you have two smooth round dough balls.
- Brush one of the two flattened bread rounds with a bit of cold water using a kitchen brush, this will act like a bit of glue.
- Take one of the little “bones” and stretch it a little at the center and place in across the diameter of the bread. Carefully, stretch the two ends of the little bone until it covers the entire diameter of the bread, almost until each end touches the baking pan.
- Repeat, until you have put four strips of bone on the bread, as seen in the photo. With your finger, squeeze the center (and the union of all the strips), brush with a little water and place one of the balls on the bread, right in the middle.
- Do the same with the other loaf.
Second Rise
- Cover and let stand in a warm place away from drafts for another hour or until they have more or less doubled in size.
- Pre-heat oven at 325 °F (165 °C).
- Once the loaves have doubled in size, prepare them for baking.
- There are two options for finishing the loaves, one is done before baking and the other after. Since I make two loaves, I usually prepare one differently from the other.
- Before baking: coat the bread with an egg wash. Beat an egg with a fork, adding a little water to dilute the egg. Using a pastry brush, carefully brush a thin layer of egg over the entire bread. It is very delicate, you don’t want to press the air out of the dough.
- After baking: Once the bread has cooled a bit, melt the butter that you separated. With a clean pastry brush, brush a layer of butter on the bread and immediately cover it with the rest of the sugar.
Baking the Pan de Muerto
- Place the rack in the center of the oven and bake for 30-40 minutes.
- Important Note: Check at half way, and turn the tray for even baking.
- If after 15-20 minutes, you check them, and they already look golden brown on over their entire surfaces, cover the loaves with aluminum foil to protect them while they finish baking.
- The loaves are ready when you tap them with your fingers lightly on the bottom and they sound hollow. But be careful when checking them, use an oven mitt because they will be very hot and the bread is a bit heavy.
- Enjoy with a cup of hot chocolate, atole, or champurrado, or display them as they will look so beautiful in your “ofrenda”
Nutrition
Did you make this recipe?
Tag @mamalatina on Instagram and hashtag it #mamalatinatips

- Mexican White Rice (Arroz Blanco) Recipe - March 20, 2026
- Cream of Broccoli Soup - March 13, 2026
- Mexican Fideo Soup - February 27, 2026