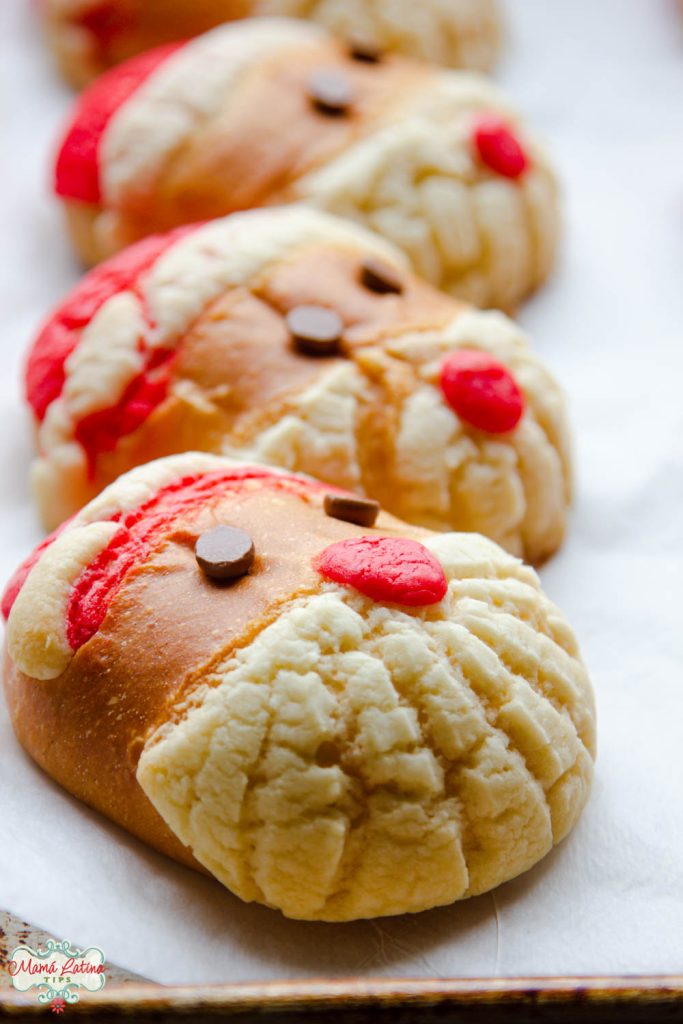
Follow this step-by-step Santa Claus Concha recipe and surprise your family this holiday season. Delicious for breakfast with a cup of hot chocolate, or as a dessert after dinner.
What is a Concha?
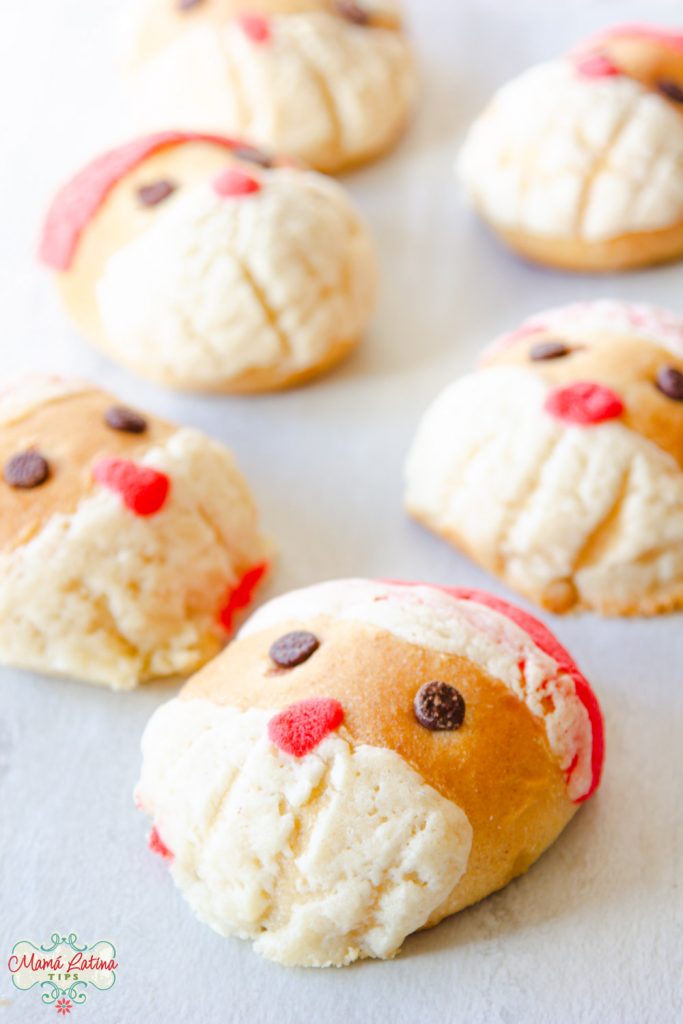
A concha is a very popular Mexican pan dulce. In English, it means shell because of its form and traditional decoration but you can find it in different colors and variations, like this variation called Santaconcha.
Making the Santa Claus concha is not difficult, but it does require a lot of patience because you have to let the dough rest for a few hours. But I assure you, it is worth it.
About the Dough
We use traditional concha dough, but with one more ingredient, ground cinnamon. I don’t know why, but during this time of year we crave cinnamon more than ever, and it gives the bread a delicious pop of flavor.
About Letting the Dough Rest
The dough has to rest a couple of times. The first time when forming the bun and the second once we have decorated it.
This rest is very important, it’s what gives the bread its flavor and consistency. That’s why we have to plan in advance where it will be done.
I recommend finding a warm place away from drafts. It can be inside one of the kitchen cabinets, in a room, and some people even use their dryer.
My favorite is the oven, when it’s off of course. I do turn it on for a minute at the minimum temperature and then turn it off again beforehand. The oven should be no more than 100 ºF (~38 ºC). Once I’m sure the temp isn’t too high and the oven is off, it’s ready to put the bread dough inside.
RELATED POST: Mexican Pan Dulce Guide from A to Z
This post may contain affiliate links from Amazon or other stores, which we add to save you time looking for things you may need. If you use these links and make a purchase, we may earn a commission at no extra cost to you. For more information, please read our privacy policy.
About the Yeast
For your bread to grow it needs the help of yeast. However, when you have stored yeast for a long time, it may have lost potency.
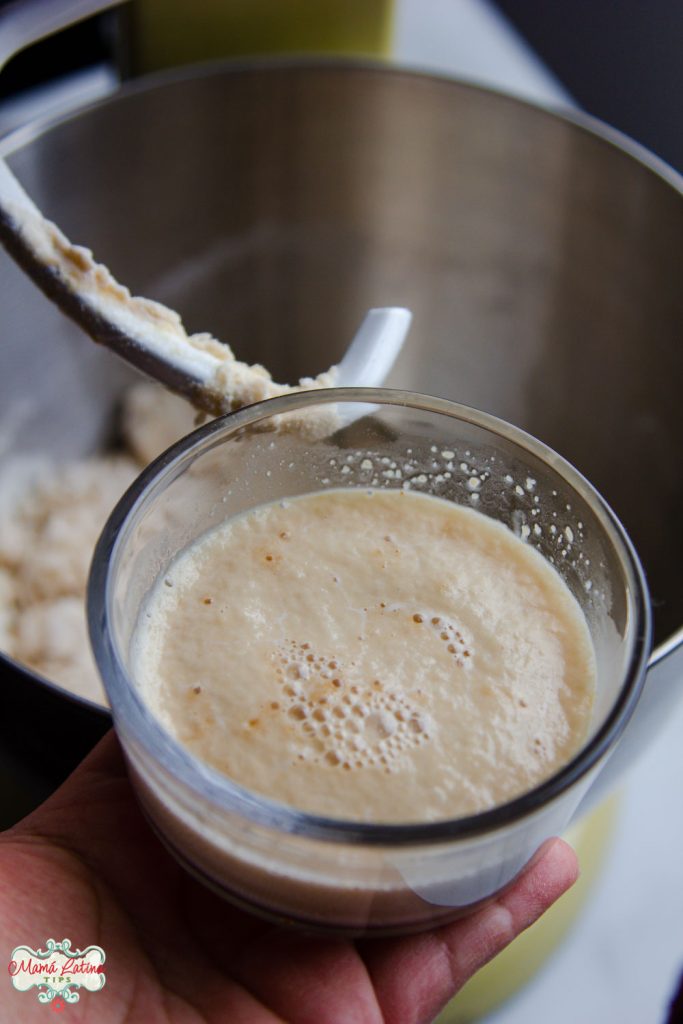
The way to know if it is still active is by following the first step in the recipe instructions which is to mix with a warm liquid, in this case, water and a little sugar to feed it. In a matter of minutes, it should grow and foam.
If this does not happen, your yeast is old and you should buy more.
About the Decoration
The paste to decorate the Santa conchas includes sugar, flour, and butter (or shortening).
Once they are baked, the paste is both crumbly and sweet. You can prepare it in advance and keep it in a container with a lid, or wrapped in plastic until use.
RELATED POST: Mexican Jelly Roll Recipe (Niño envuelto)
Santa Claus Concha Recipe
8 conchas
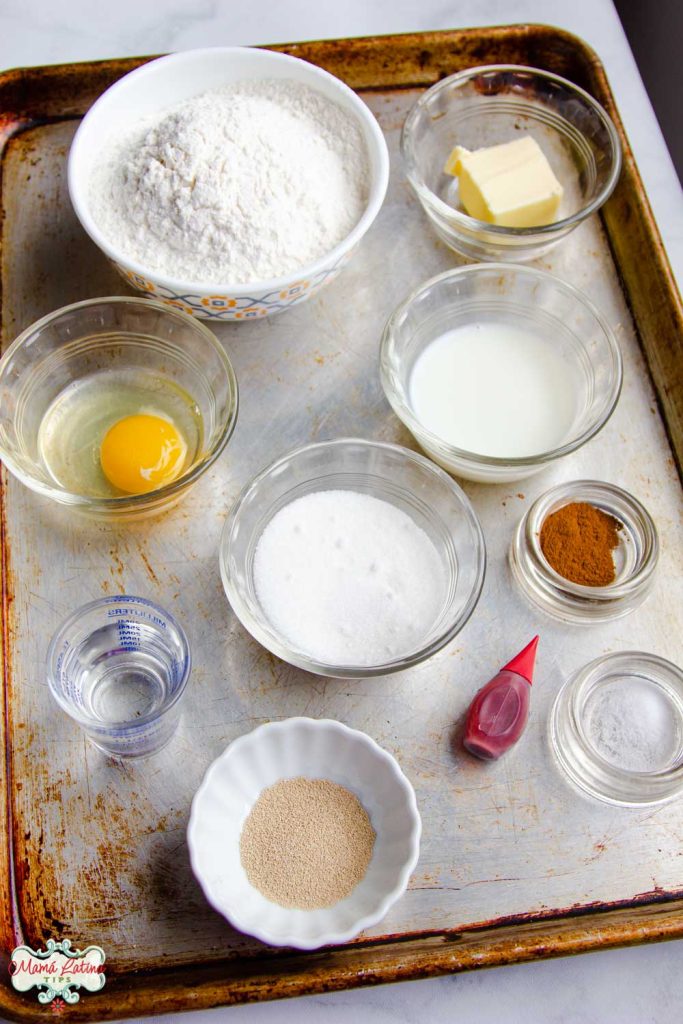
Ingredients
For the Dough
- 1 1/2 teaspoons dry active yeast (4 gr)
- 2 tablespoons warm water (~ 38°C/100°F)
- 2 cups bread or all purpose flour (250 gr)
- 1/4 teaspoon salt
- 1/2 teaspoon ground cinnamon
- 1/4 cup milk (~ 38°C/100°F)
- 1 egg
- 1/3 cup of sugar + 1/2 teaspoon
- 3 tablespoons unsalted butter, softened (45 gr)
For the Decoration
- 3/4 cup flour (100 gr)
- 3/4 cup confectioners’ sugar (100 gr)
- 1/2 cup butter, slightly soft (100 gr) or shortening
- Vegetable color red
- Chocolate chips
Equipment
- Mixer
- Small and medium size bowls
- Termomether (optional)
- Measuring spoons
- Kitchen scale or measuring cups
- Baking sheet
- Parchment paper or baking silicon mat
- Pastry silicon mat (optional)
- Rack
Process
Activate the yeast. Combine the yeast with the warm water and stir until the lumps are dissolved. Add 1/2 teaspoon of sugar, stir and let it rest in a warm place away from drafts.
Tip: The temperature of the water is important, if it’s too cold it won’t activate, if it’s too hot it will die. It should be approx 100ºF (~38 ºC). A little warmer but without being so hot that it burns to the touch.
Form the Dough
Place flour, salt, and cinnamon in a mixer bowl. Using the mixer’s dough hook, mix a little bit to integrate. If you don’t have a mixer with a bread hook, you can mix it all by hand.
Keep kneading as you add the warm milk and then the egg. You will notice that the mixture begins to get lumpy and slightly dry.
Once the yeast is active, you’ll notice it has almost doubled in size, pour it into the dough and keep kneading until it forms a ball.
Add the sugar little by little and allow it to integrate into the ball. Now you will have a sandy but very sticky dough.
Start adding the softened butter in pieces. You will notice how the dough is no longer in a ball and begins to get wet and very sticky. It will stick to the walls of the mixer bowl.
If you are doing this without a mixer, you will notice that it will stick a lot to your hands. You might feel like you want to add more flour, but please resist the temptation to do so.
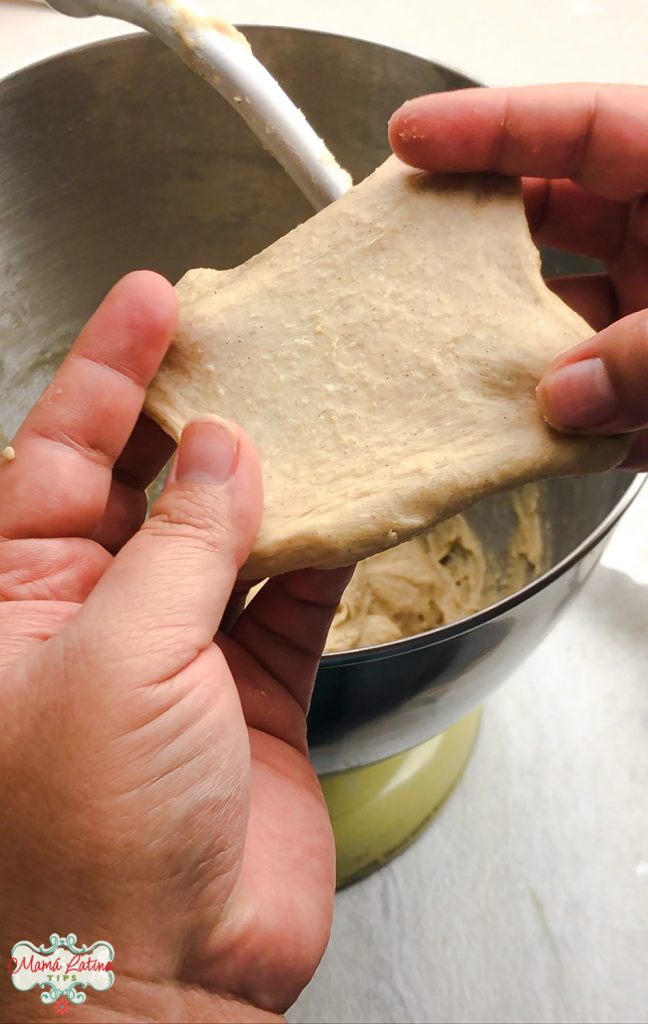
Keep mixing the dough until it begins to become elastic and separate a little from the walls of the bowl. It will take about 5-7 minutes; by hand, almost double.
The dough will still feel a bit sticky but will come off your hands more easily. Take a piece and start to stretch it, if the dough does not break and you can more or less form a “window” as shown below, it is ready.
Resting the Dough
Grease a medium bowl with either oil or melted butter. Place the dough inside and flip it to be sure the whole surface is greased.
Cover with plastic wrap or a kitchen towel and let it rest in a warm place away from drafts until it doubles in size. This will take approximately 1.5 to 2 hours, depending on the weather and humidity.
I recommend taking a photo before and after to see the growth and compare the size. If it’s a very hot day, start checking the dough after 1 hour.
Preparing the Sugar Paste
In a medium bowl, or on a clean, dry surface, combine flour, confectioners’ sugar, and butter (or shortening).
The butter should be cool to the touch but pliable. Work quickly to prevent the butter from melting in your hands. Mix everything to form a compact ball.
Divide the ball into four parts and then remove one quarter and set aside. Wrap the other three parts in plastic wrap and place in the fridge. This whitish paste will form the beard and the ornaments of the Santa Claus hat.
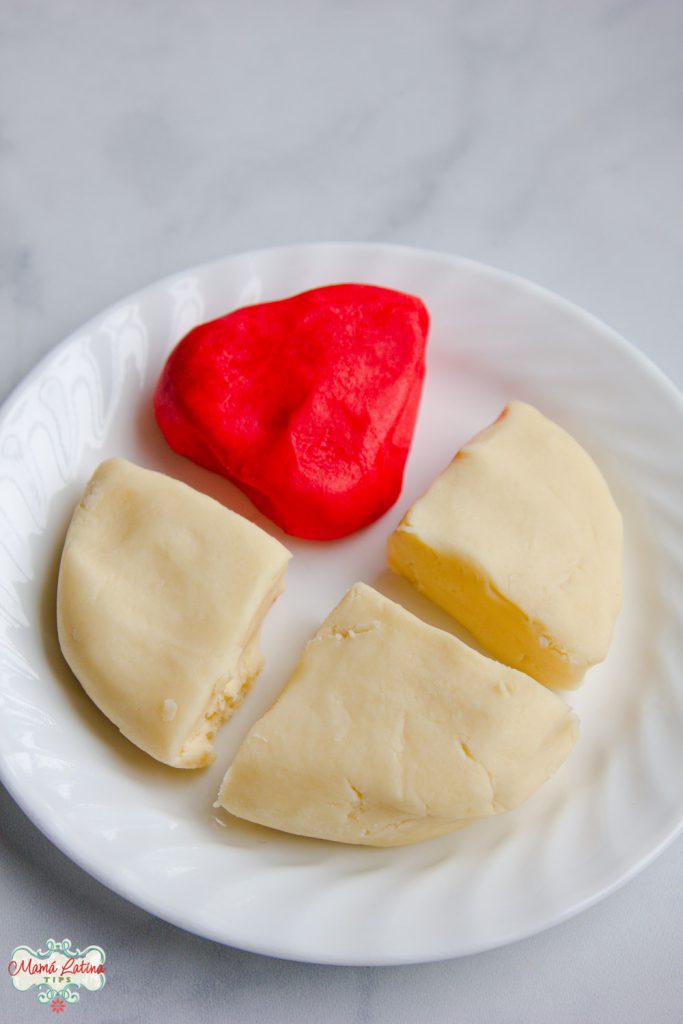
Mix the one quarter that you set aside with red food coloring. Do it little by little until you reach the desired shade of red. This paste will form the hat and the nose.
Now cover with plastic wrap and place in the fridge until ready to use.
Forming the Buns
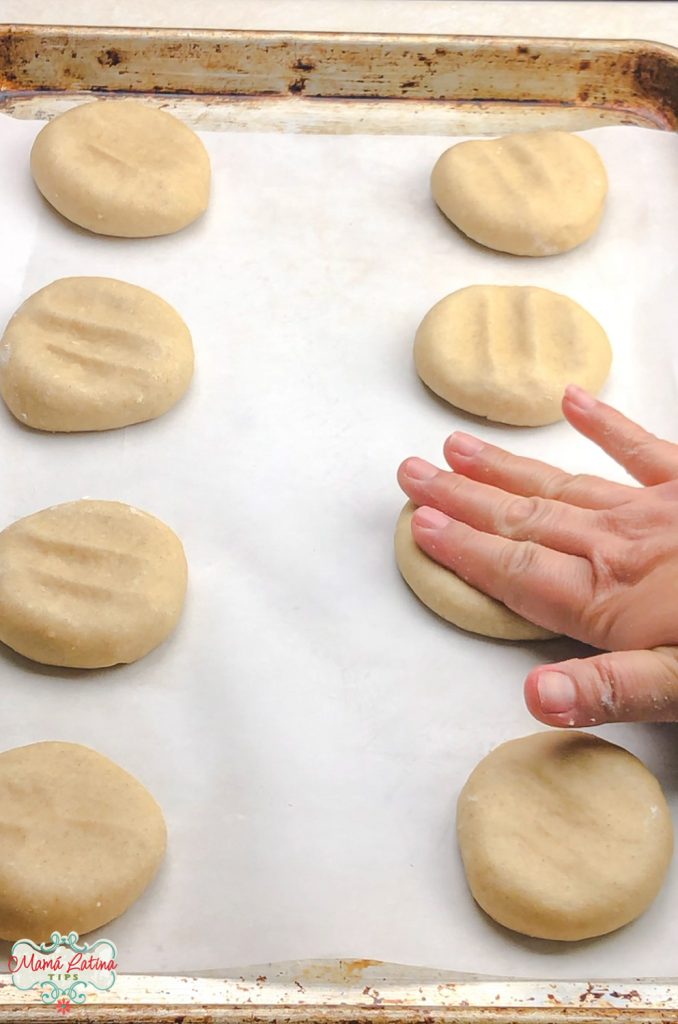
When the dough has doubled in size, take out of the bowl, “punch it” to release the gas that has formed during fermentation, and form a thick roll. With a knife or bench scraper divide into 8 equal pieces.
Take one of them and form a ball by stretching the dough and forming a ball by tucking in from the bottom. Continue until you have formed 8 balls and placed them on a large baking sheet that is greased or covered with parchment paper. Please leave space between them.
Squash them with your hand to form a flattened bun. Cover and let rest for 10-15 minutes.
Decorating the Santa Conchas
While the buns rest, remove the white sugar mixture from the refrigerator. Separate the three pieces. Then take two pieces and divide them in half. With each of these 4 smaller pieces, create four circles of the same diameter as the buns.
Use a cookie cutter to create a perfect circle or a scalloped edge if you like. Then cut them in half to create 8 half circles.
Now, take the red sugar paste out of the fridge.
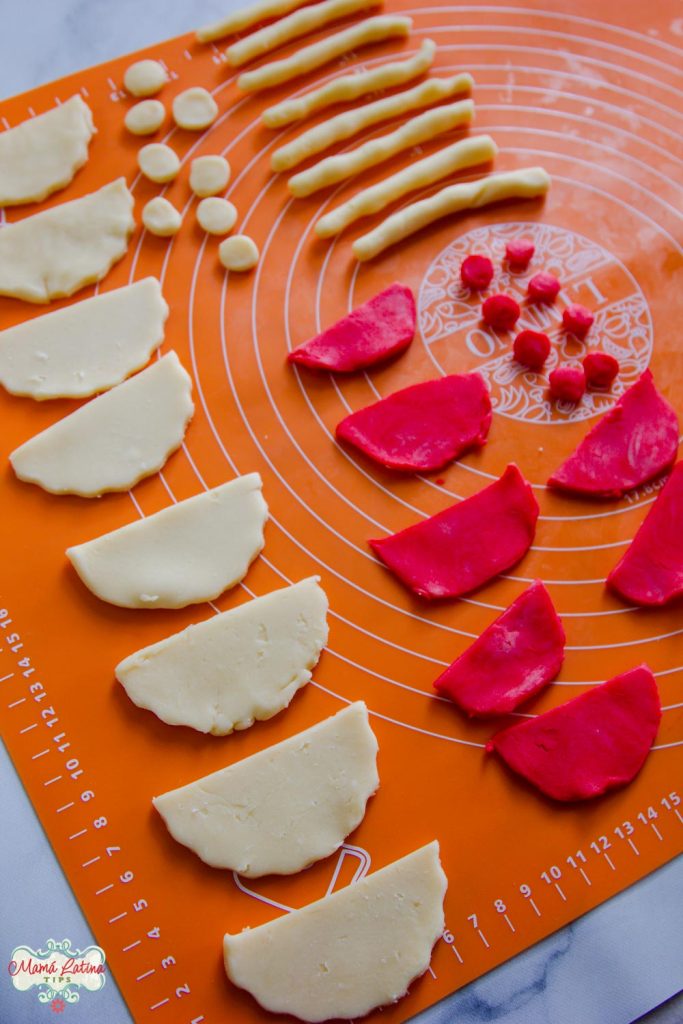
While the red paste is warming up a little, take the third piece of white paste, make a ball, flatten it and divide into eight pieces. With each of the eight pieces roll one at a time into small logs the diameter of one of the buns.
With the scraps from the cookie-cutter, make 8 small balls. These will create the edge and the pompom of Santa’s hat.
Divide the red mixture into 5 pieces. With four of the pieces, form 4 circles of the same diameter as the buns. Cut in half to make 8 half circles. With the 5th piece, cut into eight small pieces and form 8 small balls for Santa’s nose.
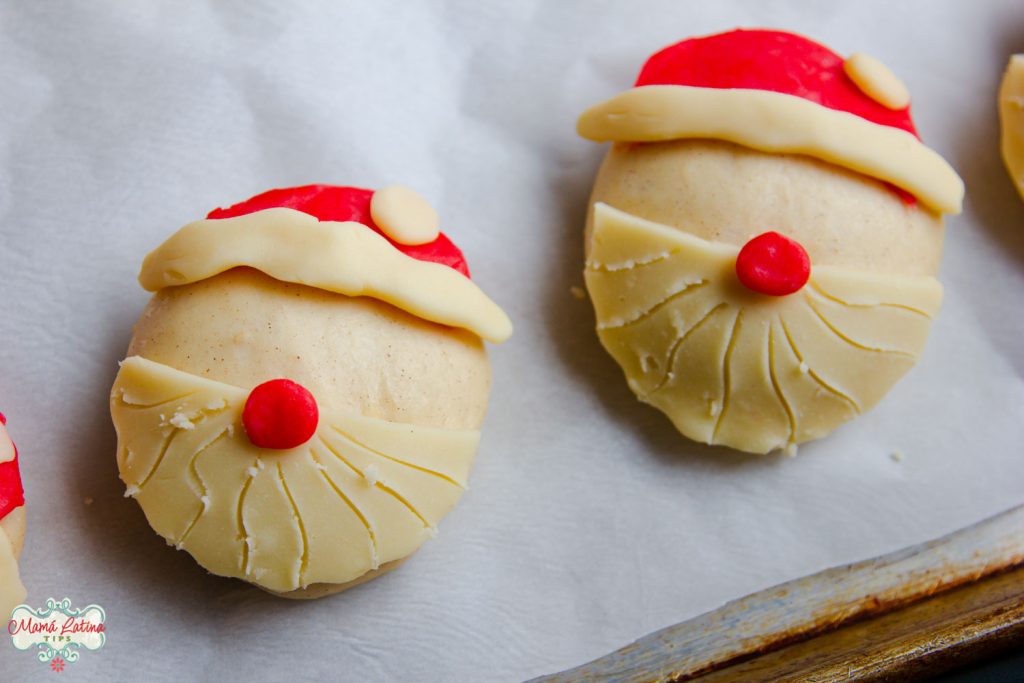
Place a red half circle and a white half circle on each bun, leaving about 1 inch (2cm) space between the two to allow for Santa Claus’ face.
Take one of the small logs, flatten it and place it on the bottom edge of the red half-circle just above where the eyes will go. Then take a white ball and place it on one side of the hat for the pompom.
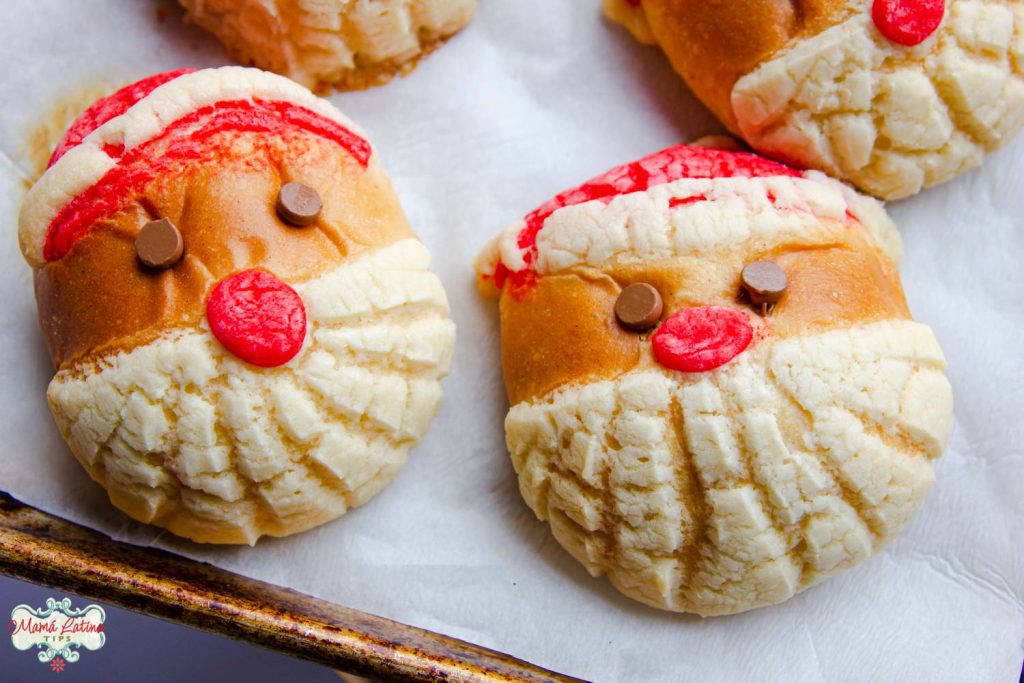
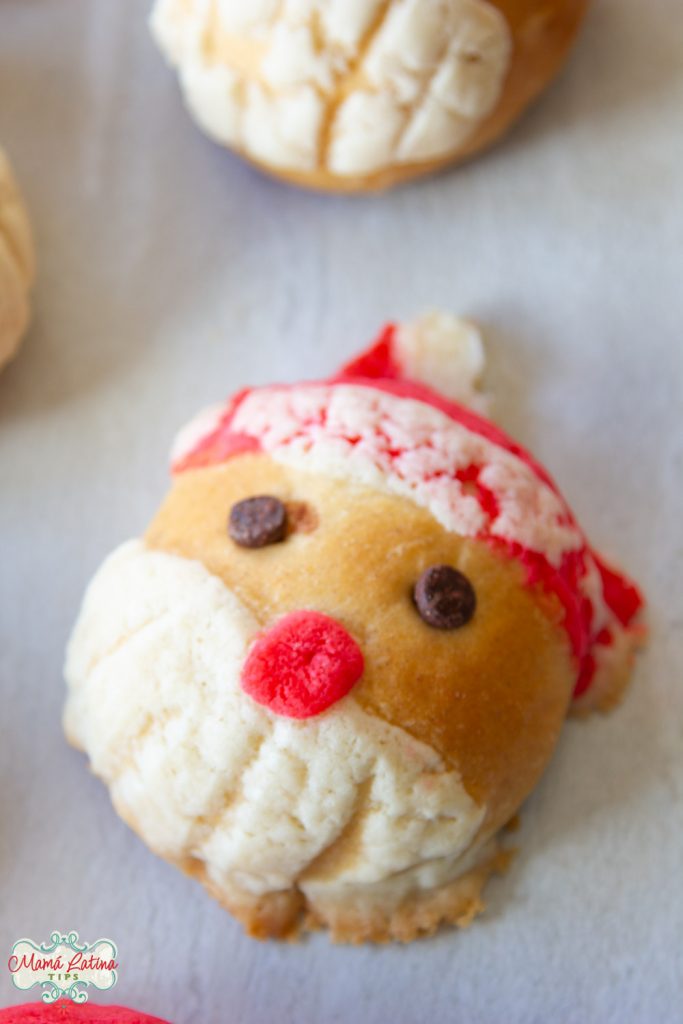
With a sharp knife, cut parallel or wavy lines in the white sugar paste half-circle from the center down to form the beard (See photo below).

Place the red ball in the center to create the nose. You can make it flat or leave it round. Your call.
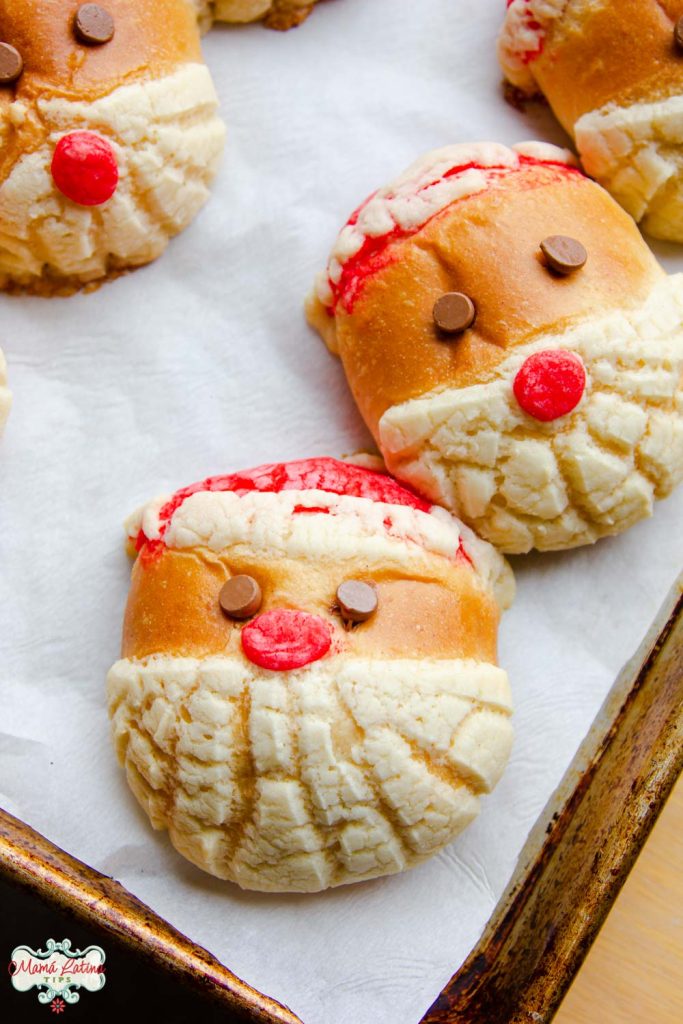
Cover with a kitchen towel or with greased plastic wrap and let them rest again in a warm place without drafts until they have grown 50% larger.

Pre-heat oven at 350°F (180°C).
Bake for 15-18 minutes or until golden brown on top and bottom. Take out of the oven. Insert two chocolate chips to make the eyes.
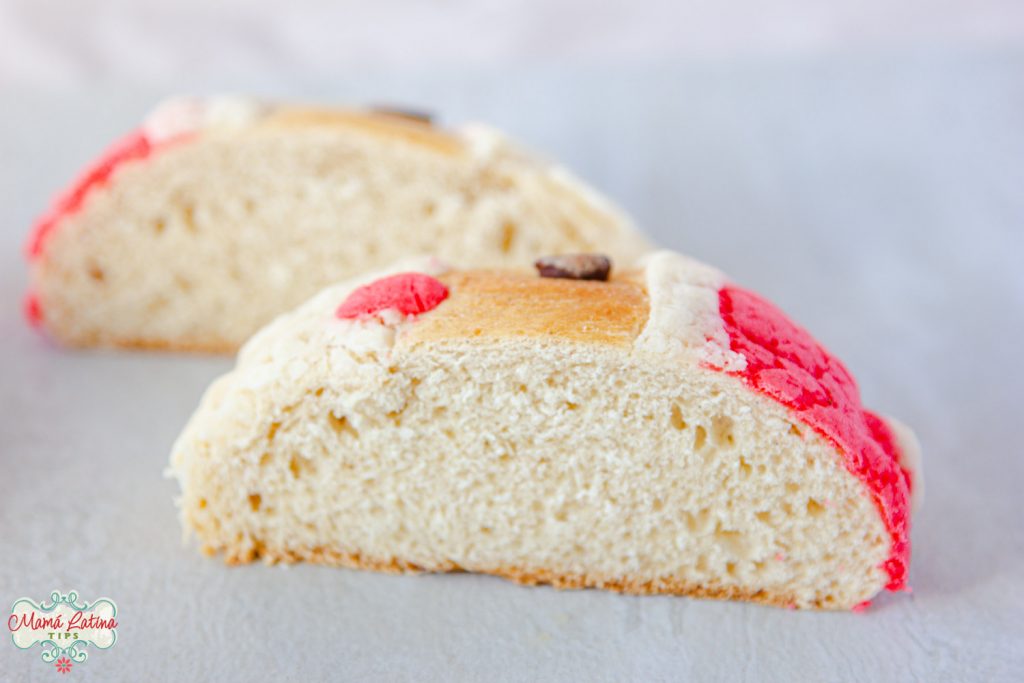
Wait about 5 minutes for the sugar to solidify a little and transfer to a wire rack. Enjoy with a cup of hot chocolate.
Merry Christmas!
More Mexican Bread Ideas
Do you like Mexican bread and pan dulce? Try at least one of these authentic pan dulce ideas.
Print Out the Santa Clause Concha Recipe

Santa Claus Concha Recipe
Ingredients
For the Dough
- 1 1/2 teaspoons dry active yeast 4 gr
- 2 tablespoons warm water ~ 38°C/100°F
- 2 cups bread or all purpose flour 250 gr
- 1/4 teaspoon salt
- 1/2 teaspoon ground cinnamon
- 1/4 cup milk ~ 38°C/100°F
- 1 egg
- 1/3 cup of sugar + 1/2 teaspoon
- 3 tablespoons unsalted butter softened (45 gr)
For the Decoration
- 3/4 cup flour 100 gr
- 3/4 cup confectioners’ sugar 100 gr
- 1/2 cup butter slightly soft (100 gr) or shortening
- Vegetable color red
- Chocolate chips
Utensilios
- Mixer
- Small and medium size bowls
- Termomether (optional)
- * Measuring spoons
- Kitchen scale or measuring cups
- Baking sheet
- Parchment paper or baking silicon mat
- Pastry silicon mat (optional)
- Rack
Instructions
- Activate the yeast. Combine the yeast with the warm water and stir until the lumps are dissolved. Add 1/2 teaspoon of sugar, stir and let it rest in a warm place away from drafts.
- Tip: The temperature of the water is important, if it’s too cold it won’t activate, if it’s too hot it will die. It should be approx 100ºF (~38 ºC). A little warmer but without being so hot that it burns to the touch.
Form the Dough
- Place flour, salt, and cinnamon in a mixer bowl. Using the mixer’s dough hook, mix a little bit to integrate. If you don’t have a mixer with a bread hook, you can mix it all by hand.
- Keep kneading as you add the warm milk and then the egg. You will notice that the mixture begins to get lumpy and slightly dry.
- Once the yeast is active, you’ll notice it has almost doubled in size, pour it into the dough and keep kneading until it forms a ball.
- Add the sugar little by little and allow it to integrate into the ball. Now you will have a sandy but very sticky dough.
- Start adding the softened butter in pieces. You will notice how the dough is no longer in a ball and begins to get wet and very sticky. It will stick to the walls of the mixer bowl.
- If you are doing this without a mixer, you will notice that it will stick a lot to your hands. You might feel like you want to add more flour, but please resist the temptation to do so.
- Keep mixing the dough until it begins to become elastic and separate a little from the walls of the bowl. It will take about 5-7 minutes; by hand, almost double.
- The dough will still feel a bit sticky but will come off your hands more easily. Take a piece and start to stretch it, if the dough does not break and you can more or less form a “window” as shown below, it is ready.
Resting the Dough
- Grease a medium bowl with either oil or melted butter. Place the dough inside and flip it to be sure the whole surface is greased.
- Cover with plastic wrap or a kitchen towel and let it rest in a warm place away from drafts until it doubles in size. This will take approximately 1.5 to 2 hours, depending on the weather and humidity.
- I recommend taking a photo before and after to see the growth and compare the size. If it’s a very hot day, start checking the dough after 1 hour.
Preparing the Sugar Paste
- In a medium bowl, or on a clean, dry surface, combine flour, confectioners’ sugar, and butter (or shortening).
- The butter should be cool to the touch but pliable. Work quickly to prevent the butter from melting in your hands. Mix everything to form a compact ball.
- Divide the ball into four parts and then remove one quarter and set aside. Wrap the other three parts in plastic wrap and place in the fridge. This whitish paste will form the beard and the ornaments of the Santa Claus hat.
- Mix the one quarter that you set aside with red food coloring. Do it little by little until you reach the desired shade of red. This paste will form the hat and the nose.
- Now cover with plastic wrap and place in the fridge until ready to use.
Forming the Buns
- When the dough has doubled in size, take out of the bowl, “punch it” to release the gas that has formed during fermentation, and form a thick roll. With a knife or bench scraper divide into 8 equal pieces.
- Take one of them and form a ball by stretching the dough and forming a ball by tucking in from the bottom. Continue until you have formed 8 balls and placed them on a large baking sheet that is greased or covered with parchment paper. Please leave space between them.
- Squash them with your hand to form a flattened bun. Cover and let rest for 10-15 minutes.
Decorating the Santa Conchas
- While the buns rest, remove the white sugar mixture from the refrigerator. Separate the three pieces. Then take two pieces and divide them in half. With each of these 4 smaller pieces, create four circles of the same diameter as the buns. Use a cookie cutter to create a perfect circle or a scalloped edge. Then cut them in half to create 8 half circles.
- Now, take the red sugar paste out of the fridge.
- While the red paste is warming up a little, take the third piece of white paste, make a ball, flatten it and divide into eight pieces. With each of the eight pieces roll one at a time into small logs the diameter of one of the buns. With the scraps from the cookie-cutter, make 8 small balls. These will create the edge and the pompom of Santa’s hat.
- Divide the red mixture into 5 pieces. With four of the pieces, form 4 circles of the same diameter as the buns. Cut in half to make 8 half circles. With the 5th piece, cut into eight small pieces and form 8 small balls for Santa’s nose.
- Place a red half circle and a white half circle on each bun, leaving about 1 inch (2cm) space between the two to allow for Santa Claus’ face.
- Take one of the small logs, flatten it and place it on the bottom edge of the red half-circle just above where the eyes will go. Then take a white ball and place it on one side of the hat for the pompom.
- With a sharp knife, cut parallel or wavy lines in the white sugar paste half-circle from the center down to form the beard (See photo below).
- Place the red ball in the center to create the nose. You can make it flat or leave it round. Your call.
- Cover with a kitchen towel or with greased plastic wrap and let them rest again in a warm place without drafts until they have grown 50% larger.
- Pre-heat oven at 350°F (180°C).
- Bake for 15-18 minutes or until golden brown on top and bottom. Take out of the oven. Insert two chocolate chips to make the eyes.
- Wait about 5 minutes for the sugar to solidify a little and transfer to a wire rack. Enjoy with a cup of hot chocolate.
Nutrition
Did you make this recipe?
Tag @mamalatina on Instagram and hashtag it #mamalatinatips

- Mexican White Rice (Arroz Blanco) Recipe - March 20, 2026
- Cream of Broccoli Soup - March 13, 2026
- Mexican Fideo Soup - February 27, 2026